Creating toys for your little one is not just a delightful hobby; it’s a chance to give them something truly special. Imagine the joy on your baby’s face when they hold a toy you made with your own hands.
Sewing baby toys is easier than you might think, even if you’re new to sewing. With just a few tools and some creativity, you can craft safe, fun, and unique toys that your child will treasure. You’ll discover simple steps and tips that make sewing baby toys a rewarding experience.
Let's dive into the world of DIY baby toys and make something memorable together.
Choosing Materials
Selecting the right materials is crucial for sewing baby toys. Soft, durable fabrics like cotton ensure safety and comfort. Opt for non-toxic, washable materials to maintain hygiene and longevity.
Choosing the right materials is crucial for sewing baby toys. The perfect materials ensure safety, durability, and comfort. This section guides you in selecting the best materials for your project. Let's explore how to make the best choices for fabric, fillings, and additional supplies.
Selecting Fabric Types
Start by picking soft, durable fabrics. Cotton and fleece are excellent choices. They are gentle on a baby's skin. Cotton is breathable and easy to clean. Fleece is warm and cuddly. Avoid fabrics that fray easily. These can become a safety hazard. Bright colors can stimulate a baby's senses. Choose prints that are cheerful and engaging.
Picking Safe Fillings
Safety is the top priority in toy fillings. Polyester fiberfill is a popular choice. It's soft, lightweight, and hypoallergenic. Another option is cotton batting. It offers a natural, safe alternative. Always avoid small, loose items like beans. These can pose choking risks. Ensure the filling is securely enclosed.
Choosing Additional Supplies
Select child-safe threads and fasteners. Opt for strong, durable threads. They should withstand tugging and pulling. Consider using embroidery for facial features. This avoids the risk of loose parts. Velcro can be a safe closure option. It's easy for small hands to manage. Always double-check safety certifications for all materials.
Essential Tools
Creating baby toys requires essential tools like needles, thread, and fabric. Scissors and measuring tape ensure precise cuts and sizes. A sewing machine speeds up the process, making toy creation easier and more fun.
When sewing baby toys, choosing the right tools is essential. They help in making the process easy and fun. With the correct tools, you create safe and durable toys. Let's explore the essential tools needed.
Sewing Machine Vs. Hand Sewing
Both methods have their benefits. A sewing machine saves time. It makes clean and sturdy stitches. Ideal for larger projects. Hand sewing is perfect for small details. Gives you more control. It's great for adding personal touches to toys.
Needles And Threads
Needles come in various sizes. Choose a size based on fabric thickness. A thinner needle works for delicate fabrics. Use thicker needles for heavier materials. Threads should be strong. Cotton threads are common. Polyester threads offer more strength and flexibility.
Cutting Tools
Sharp scissors are a must. They ensure clean cuts on fabric. Fabric scissors should only be used for fabrics. This keeps them sharp. A rotary cutter is another option. It provides precise cuts. A cutting mat protects surfaces and aids accurate cutting. Safety is key when using sharp tools. Always store them safely after use.
Designing Baby Toys
Designing baby toys offers endless possibilities for creativity and fun. It involves choosing shapes, colors, and textures that stimulate a baby's senses. This process requires a focus on safety and simplicity. Baby toys should be engaging, yet safe for little hands and mouths.
Simple Shapes And Patterns
Simple shapes work best for baby toys. Circles, squares, and triangles are easy to sew. They provide clear lines and recognizable forms. Patterns should be uncomplicated and repetitive. This helps babies learn and recognize different shapes. Use soft fabrics that are easy to sew and safe for babies.
Incorporating Colors And Textures
Colors catch a baby's eye. Bright, contrasting colors are ideal for stimulating vision. Use a variety of colors to make toys more interesting. Soft textures are soothing and comforting for babies. Mix different fabric textures like cotton, fleece, and velvet. This variety keeps babies engaged and curious.
Creating Patterns
Crafting adorable baby toys involves simple sewing techniques and creativity. Choose soft fabrics and bright colors. Cut and stitch patterns with care, ensuring safety and comfort for little ones.
Creating unique and adorable baby toys is an exciting journey. At the heart of this process is the creation of patterns. Patterns provide a blueprint for your sewing adventure, ensuring that each toy is consistent and safe for little ones to enjoy. Whether you choose to design your own or rely on pre-made templates, patterns are essential for transforming fabric into delightful creations. Let's explore the art of drawing your own patterns and how pre-made templates can simplify the sewing process.
Drawing Your Own Patterns
Crafting your own patterns allows you to unleash your creativity. Begin by sketching your toy design on paper. Think about the shape, size, and features that will make the toy special. Consider your baby’s interests or favorite animals for inspiration. Once you have a basic sketch, refine it into a detailed pattern. Use a ruler to ensure accuracy and symmetry. Transfer your sketch to a sturdier paper, like cardstock, to create a durable template. This ensures you can reuse it for future projects or share it with friends.
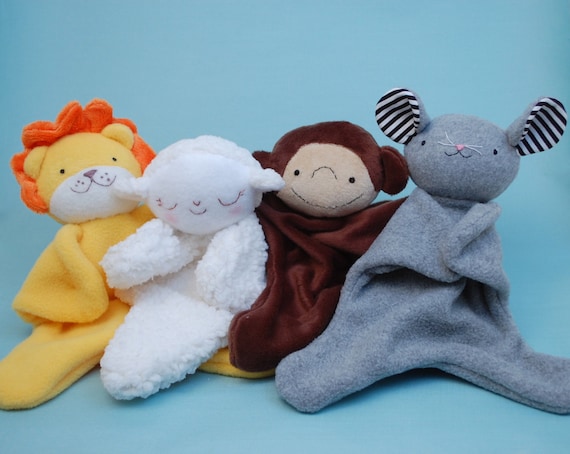
Using Pre-made Templates
Pre-made templates are a great resource for beginners or those short on time. These templates offer a simple way to start sewing without the hassle of drafting patterns from scratch. Many websites offer free downloadable templates for various baby toys, from cuddly bears to playful ducks. Simply print the template, cut it out, and you're ready to trace it onto your fabric. Consider using a transparent fabric marker for tracing. This ensures precision and keeps your fabric clean. Using pre-made templates can also provide reassurance that your toy will turn out as expected. Creating patterns is a delightful step in sewing baby toys, whether you draw them yourself or use ready-made options. Which method excites you more, and how might it influence the uniqueness of your toy?
Cutting Fabric
Creating baby toys begins with cutting fabric into desired shapes. Use sharp scissors for clean edges and precision. Ensure the fabric is soft and safe for little hands.
Creating delightful baby toys through sewing is a heartwarming endeavor that combines creativity and craftsmanship. One crucial step in this process is cutting fabric. This step lays the foundation for your toy's shape and ensures everything comes together seamlessly. With the right techniques, you can avoid common pitfalls and ensure your project is off to a great start. Let's dive into the essential aspects of cutting fabric for baby toys.
Marking And Tracing Patterns
Before you wield those scissors, it's essential to mark and trace your patterns accurately. Use tailor's chalk or a fabric marker for clear and precise lines. Lay your pattern on the fabric, ensuring it's flat and wrinkle-free. Pin it securely, especially around the edges, to prevent shifting while tracing. Consider using a transparent ruler to maintain straight lines and ensure your toy's dimensions are consistent. This attention to detail can make a big difference in the final product.
Cutting Techniques For Accuracy
Accuracy is key when cutting fabric for baby toys. Invest in a good pair of fabric scissors; dull scissors can ruin your fabric and lead to uneven cuts. Cut slowly and steadily along the traced lines, keeping your scissors perpendicular to the fabric for clean edges. This simple technique prevents fraying and maintains the integrity of the pattern. Think about how each cut affects the overall shape and appearance of the toy. Would you like a crisp, precise edge, or does a softer finish suit the design better? By focusing on these steps, you ensure your baby toy is not only adorable but also safe and durable for little hands. Now, what kind of toy will you craft next? The possibilities are endless when you have the right tools and techniques at your disposal!
Credit: threadistry.com
Sewing Techniques
Sewing baby toys is a delightful craft that combines creativity with care. Using the right sewing techniques ensures toys are safe and durable. Whether you're an experienced sewer or a beginner, understanding basic stitches and seams is crucial. Let's explore how these techniques can make your baby toy projects successful.
Basic Stitches For Beginners
Starting with simple stitches helps build confidence in sewing. The running stitch is easy and versatile. It's great for straight lines and simple joins. The backstitch provides strength and durability. It works well for areas needing extra support. The whip stitch is perfect for closing stuffed toys. It creates a neat and secure seam.
Sewing Seams And Edges
Seams hold toy parts together. A straight seam is the most common type. It's essential for connecting fabric pieces smoothly. French seams add elegance and strength. They're ideal for toys needing extra durability. Overlocked edges prevent fabric from fraying. This technique keeps toys looking neat and tidy.
Stuffing And Finishing
Stuffing and finishing are crucial in creating delightful baby toys. These steps ensure your handmade toys are safe and durable for little ones. Proper stuffing gives toys their shape and softness, while neat finishing adds to their appeal and safety. Let's explore how to add fillings safely and close openings neatly.
Adding Fillings Safely
Choose hypoallergenic stuffing for baby toys. Polyester fiberfill is a popular choice. It is soft and safe. Ensure stuffing materials are clean and free from allergens. Use small amounts of stuffing at a time. This prevents lumps and unevenness in the toy. Fill toys evenly for a consistent shape. Avoid overstuffing. It can strain seams and cause them to open.
Closing Openings Neatly
Securely closing openings is key. Use a ladder stitch for a clean finish. It blends with the seam, making it invisible. Thread your needle with matching thread. This enhances the neatness of the closure. Ensure stitches are tight and consistent. Check for loose threads and trim them off. Inspect the closure carefully. Tug gently to test its strength. A well-closed opening adds to the toy's longevity.

Credit: makingthingsisawesome.com
Adding Embellishments
Enhancing baby toys with embellishments adds charm and safety. Choose soft fabrics and securely sew on details. Bright colors and textures engage a baby's senses, creating delightful and safe playtime companions.
Adding embellishments to baby toys not only makes them visually appealing but also adds a personal touch. These small details can turn a simple toy into a cherished keepsake. As you sew, consider what unique elements you can add to make the toy special for the child receiving it.
Attaching Buttons And Ribbons
Buttons and ribbons can add a playful element to your baby toy. However, ensure they are securely sewn to avoid choking hazards. Use a strong thread and double stitch each button, checking for any loose ends. Consider using large, colorful buttons for a cheerful look. Ribbons can be looped or tied in bows for added flair. Always choose soft, washable materials to keep the toy safe and durable. Adding buttons and ribbons can also make the toy interactive. Babies love to touch and explore textures, so these embellishments can enhance their sensory experience. How can you make this toy even more engaging?
Embroidering Faces And Details
Embroidering adds character to your toy. Faces, initials, or small designs can make a big impact. Use embroidery floss to create expressive eyes or a cute smile. Choose simple designs if you're new to embroidery. A basic stitch can still convey warmth and personality. Experiment with different colors to see what makes the toy come alive. Embroidering is also a chance to add meaningful details. You might stitch the baby's name or a special date. These small touches can transform a toy into a beloved memento. Adding embellishments is a creative process. What little details can you add to create a toy that will be treasured for years to come?
Safety Checks
Creating baby toys requires careful attention to safety. Small children love exploring, and their toys should be completely safe. Before you finish sewing any toy, thorough safety checks are crucial. These checks ensure that the toys are not only fun but also secure for the little ones.
Ensuring Secure Fastenings
Loose parts pose a choking hazard. Always use strong threads to attach buttons and embellishments. Double stitch fastenings for extra security. Velcro and zippers should be tightly sewn. Check all seams for strength. Reinforce weak areas with additional stitching.
Testing For Durability
Babies can be rough with toys. Durable materials withstand tugging and chewing. Choose fabrics that resist wear and tear. Test your toy by pulling on seams. Ensure the toy holds its shape after pressure. Avoid fragile materials that might break easily.
Caring For Handmade Toys
Handmade baby toys hold a special charm. They are crafted with love and care. Maintaining these toys ensures their longevity. Proper care keeps them safe and clean for your little one. Caring for handmade toys involves cleaning, storage, and regular maintenance. Following simple tips will ensure your handmade toys stay delightful and safe.
Cleaning And Maintenance
Regular cleaning keeps toys safe. Use mild soap and warm water. Avoid harsh chemicals. They can damage delicate materials. Spot clean stains immediately. Dry toys thoroughly to prevent mold. Check for loose threads or parts. Repair them promptly to ensure safety. Inspect toys often for wear and tear.
Storage Tips
Proper storage keeps toys in good shape. Keep toys in a cool, dry place. Avoid direct sunlight. It can fade colors. Use breathable bags or boxes. This prevents dust accumulation. Store toys away from pets. They might damage delicate details. Regularly rotate toys for even wear.

Credit: makingthingsisawesome.com
Frequently Asked Questions
How Do I Start Sewing Baby Toys?
Begin by selecting a simple toy pattern. Gather soft fabrics, threads, and sewing tools. Follow the pattern instructions carefully. It's important to use baby-safe materials. Sew each piece with attention to detail. Stuff the toy with hypoallergenic filling. Ensure all parts are securely attached to avoid choking hazards.
What Materials Are Safe For Baby Toys?
Choose soft, non-toxic, and hypoallergenic fabrics. Cotton, fleece, and felt are great options. Avoid fabrics with harmful chemicals or dyes. Use embroidery threads instead of buttons for features. This ensures safety if the toy is chewed. Always pre-wash fabrics to prevent irritation.
Can Beginners Sew Baby Toys Easily?
Yes, beginners can sew baby toys with basic skills. Start with simple patterns like a stuffed animal or soft block. Online tutorials can provide step-by-step guidance. Choose easy-to-sew fabrics and follow instructions closely. Practice patience and enjoy the process of creating for your little one.
How Can I Personalize Baby Toys?
Personalize toys by adding the baby's name or initials. Use embroidery or fabric paint for customization. Select colors that match the nursery theme. Incorporate unique details like tags or textures. Personalization adds a special touch and makes the toy unique.
Ensure all additions are safe for babies.
Conclusion
Crafting baby toys by sewing offers joy and creativity. It's simple and fun. You create unique toys with love and care. Materials are affordable and easy to find. Sewing strengthens hand-eye coordination. It also improves patience and focus. Handmade toys can become cherished keepsakes.
They tell stories and create memories. Designing toys can bring families together. It fosters learning and sharing. Start sewing today and enjoy the process. Every stitch counts and builds happiness. Your baby will treasure these toys. Happy sewing!