

Imagine the joy on your child's face when they see a brand-new toy box, crafted by none other than you. It's not just a storage solution; it's a testament to your creativity and love.
With DIY toy box plans, you have the power to transform a pile of wood into a treasure chest for toys. You don't need to be a master carpenter to bring this project to life. Whether you're looking for a fun weekend activity or want to personalize your child's play area, these plans offer the perfect opportunity.
Dive in, and discover how you can create a unique toy box that fits perfectly into your home and your child's world. Ready to make some sawdust and memories? Let's get started!
Credit: learn.kregtool.com
Materials And Tools
Crafting a DIY toy box requires basic materials and tools like wood, screws, and a saw. Sandpaper ensures smooth edges, while paint or varnish adds color. A tape measure helps in accurate dimensions for a perfect fit.
Building your own toy box is a rewarding project that combines creativity and practicality. It's not only about the final product but also about the journey of crafting something with your own hands. To get started on this DIY adventure, you'll need the right materials and tools, which are crucial for ensuring your toy box is sturdy and safe for little hands. Let’s dive into what you’ll need to gather before you start your build.
Essential Materials
First, consider the main material for your toy box. Wood is a popular choice because it's durable and easy to work with. Plywood or MDF (Medium-Density Fiberboard) can be excellent options for the sides and bottom. Ensure it's at least ½ inch thick to support the weight of toys. Sandpaper is essential for smoothing out any rough edges. A fine-grit sandpaper will help make the surface child-friendly, reducing the risk of splinters. Don’t forget wood glue or screws to hold the pieces together. Depending on your design preference, you might choose one over the other, but often a combination of both provides the best strength. Consider adding some hinges if your toy box will have a lid. Opt for soft-close hinges to prevent little fingers from getting pinched.
Required Tools
You’ll need some basic tools to cut and assemble your materials. A saw is necessary for cutting the wood to your desired dimensions. A hand saw might be sufficient, but a power saw can save you time and effort, especially if you're making multiple cuts. A drill will come in handy for making holes for screws and hinges. Make sure to have the right drill bits on hand to match the screws you'll be using. A tape measure and square will help ensure your cuts are precise, which is crucial for a box that fits together well. Having a screwdriver is also essential if you are using screws. An electric screwdriver can make the assembly process quicker and easier. Lastly, consider a paintbrush or roller if you plan to add a splash of color or protective finish to your toy box. By gathering these materials and tools, you're setting yourself up for success. Have you thought about involving your kids in the process? It could be a fun and educational experience for them, too. What better way to teach them the value of creating something from scratch?
Credit: www.etsy.com
Design Inspiration
Create a unique toy box with simple DIY plans. Express your creativity while organizing toys efficiently. Perfect for adding a personal touch to your child's playroom.
Creating a DIY toy box can be as exciting as the treasures it will hold. When planning your project, finding the right design inspiration is key to building something both functional and beautiful. From classic to modern and themed designs, the possibilities are endless. Let's dive into some ideas to spark your creativity.
Classic Styles
Think about the timeless appeal of classic designs. A simple wooden toy box with carved details can evoke a sense of nostalgia. Remember the toy box your grandparents might have had? These designs often use sturdy materials like oak or pine. Consider adding a soft-close lid to protect little fingers. A coat of natural varnish can highlight the wood's grain, making it both a practical and stylish addition to your child’s room.
Modern Concepts
Modern toy boxes often embrace clean lines and minimalist aesthetics. These designs are great if you prefer a clutter-free look. Consider using sleek materials like acrylic or metal. Think about integrating storage compartments for better organization. A neutral color palette can keep the toy box versatile, fitting into any room decor.
Themed Ideas
Why not let your child's interests guide the design? A pirate chest for an adventurous spirit or a castle for a budding princess can make tidying up fun. These themed toy boxes can double as play items themselves. Use vibrant colors or decals to bring the theme to life. Just imagine the excitement in your child’s eyes when they see their favorite storybook characters on their toy box. When you think about it, the design of a toy box can be as unique as your child's imagination. What will your next DIY project look like?
Planning And Measurements
Creating a DIY toy box starts with good planning. Accurate measurements ensure a perfect fit. Think about your needs and available space first.
Space Considerations
First, evaluate the room where the toy box will sit. Check the available space. Make sure the toy box won't block pathways or doors. Consider the room's layout. Will the box be against a wall or in a corner? Decide the best spot before you start building.
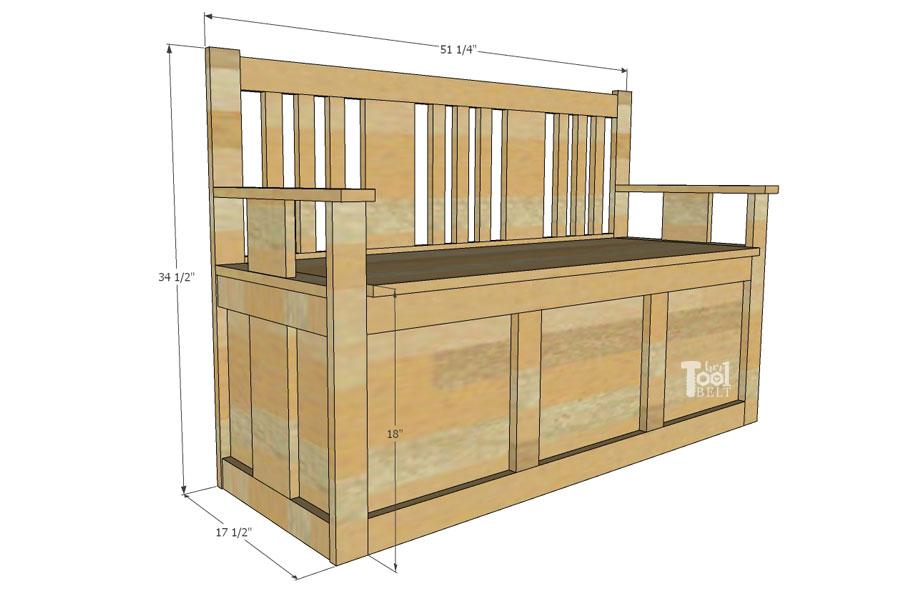
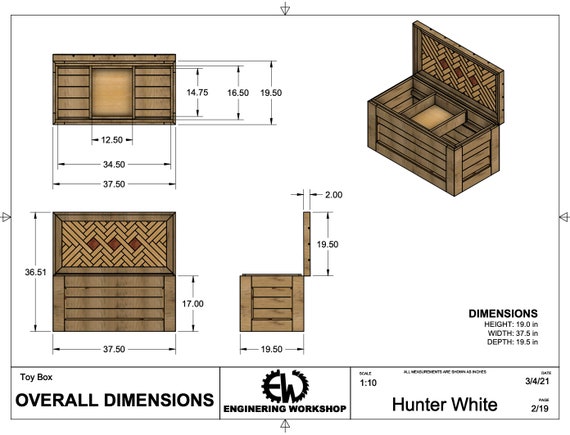
Size And Dimensions
Next, decide on the toy box size. A large toy collection needs more room. Measure the toys you plan to store. Write down these measurements. Make sure the box is big enough. But don't make it too big. You want a toy box that fits the room well.
Consider your child's height. A shorter box is easier for them to reach. A taller box might store more, but is less accessible. Balance storage needs with ease of use. These simple steps lead to a successful project.
Construction Techniques
Creating a toy box using DIY plans offers a fun and rewarding experience. With basic tools and easy-to-follow steps, building a custom toy box becomes simple. These plans encourage creativity and provide a practical storage solution for children's toys.
Creating your own toy box is a rewarding project that not only saves money but also allows you to customize a piece that perfectly fits your space and style. With some basic tools and materials, you can build a sturdy and attractive toy box for your children or even as a unique gift. In this section, we'll discuss essential construction techniques that will ensure your toy box is both durable and visually appealing.
Joinery Methods
The strength and stability of your toy box largely depend on the joinery methods you choose. Simple butt joints with screws are easy to execute and work well for beginners. However, if you want a cleaner look without visible screws, consider using dowel joints or pocket holes. For added durability, you might try dovetail joints. Though they require more precision, they offer a tight fit that holds the box together securely. Experimenting with different joinery methods can be a fun learning experience. Which one will you try?
Assembly Tips
When it comes to assembling your toy box, preparation is key. Begin by laying out all your pieces and double-checking your measurements. This minimizes mistakes and saves time in the long run. Use clamps to hold pieces firmly in place while you attach them. This ensures your joints are tight and your box remains square. If you’ve ever struggled with misaligned pieces, you know how frustrating it can be. Don't rush the assembly process. Take your time to ensure every piece fits perfectly before moving to the next step. Have you ever noticed how patience pays off in DIY projects? Building a toy box can be a fun and fulfilling project that adds a personal touch to your home. With these construction techniques, you’re well on your way to creating a functional and beautiful piece. What’s the first step you’re excited to tackle?
Decorative Elements
Decorating your DIY toy box adds personality. It turns a simple box into a special piece. The right decorative elements can make the box unique and fun. This can enhance the room's aesthetic. Let's explore how to decorate it beautifully.
Painting And Finishing
Choose colors that match the room. Bright colors make the toy box stand out. Pastel shades give a calming effect. Use non-toxic paint for safety. Apply a primer before painting. It helps the paint stick better. After painting, add a protective finish. This makes the surface smooth and shiny. It also protects the paint from scratches.
Adding Personal Touches
Personal touches make the toy box special. Add the child’s name to the box. Use stencils for neat lettering. Stickers or decals add fun elements. Choose characters your child loves. Use fabric for a cozy touch. Glue soft fabrics to the box sides. Attach small toys or ornaments for decoration. This makes the toy box a playful centerpiece.
Safety Features
Creating a DIY toy box is rewarding and fun. Safety features are essential when building a toy box for children. Ensuring the box is safe enhances peace of mind. Let's explore some safety features for your DIY toy box plans.
Child-safe Hinges
Child-safe hinges prevent pinched fingers. These hinges close slowly, reducing risks. They protect little hands from injury. Choose hinges with soft-closing mechanisms. This ensures safe opening and closing. Install them properly for maximum safety.
Rounded Edges
Sharp edges can cause harm. Rounded edges keep children safe. They reduce the risk of cuts and bruises. Use sandpaper to smooth corners. Rounded edges are safer and look better. Create a safe environment for play.
Storage Solutions
Storage solutions for toy boxes can transform any messy space. A well-designed toy box ensures toys remain organized and easily accessible. It also maximizes available space, making the room look tidy and spacious. DIY toy box plans offer the flexibility to tailor storage according to specific needs and preferences.
Maximizing Space
Maximizing space is crucial in a child's playroom. A toy box with a compact design helps fit more toys without clutter. Think vertical. Consider tall toy boxes with multiple shelves. These make use of vertical space efficiently. Foldable lids allow easy access and save space. Choose designs that utilize corners effectively. Corner toy boxes make use of often wasted space. Opt for modular options. These can be rearranged to fit different spaces.
Organizational Compartments
Organizational compartments keep toys sorted and neat. Separate compartments help categorize toys by type or size. Use dividers inside the toy box for better organization. Smaller bins inside the box can hold tiny toys. Adjustable compartments offer flexibility as toy collections grow. Labels on compartments help identify contents quickly. A clear lid lets you see inside without opening. Transparent compartments provide visibility and quick access.
Maintenance Tips
Keep your DIY toy box looking new with simple maintenance. Regularly check for loose screws and tighten them. Clean with a damp cloth to remove dust and stains.
Maintaining your DIY toy box ensures it stands the test of time, providing endless joy for your kids. Regular upkeep not only keeps it looking great but also ensures it remains a safe haven for your child's treasured toys. Let's dive into some practical maintenance tips to keep your creation in top shape.
Cleaning Guidelines
Keeping your DIY toy box clean is surprisingly simple. Start by wiping it down with a damp cloth once a week to remove dust and fingerprints. For tougher stains, a mild soap solution does wonders without damaging the finish. Make sure to dry it thoroughly after cleaning. Moisture can warp the wood or weaken the structure over time. Have you ever noticed how a little regular care can prevent bigger issues?
Repair Suggestions
Even with the best care, things might need fixing. If you notice a loose hinge or a wobbly leg, tighten screws with a screwdriver. A quick check every month can prevent accidents. For minor scratches or dents, a wood filler or a matching color crayon can be your best friend. Simply fill in the scratch, let it dry, and smooth it out with fine sandpaper. Have you found that small repairs can prolong the life of many household items? Taking these simple steps can ensure your DIY toy box remains a cherished piece in your home. What's your favorite maintenance tip for keeping things in great condition?

Credit: www.etsy.com
Frequently Asked Questions
What Materials Do I Need For A Diy Toy Box?
To build a DIY toy box, you'll need plywood, screws, hinges, and wood glue. Sandpaper and paint are optional for finishing touches. Gather a saw, measuring tape, and drill for assembly. These materials provide durability and a personalized touch to your toy box project.
How Long Does It Take To Build A Toy Box?
Building a toy box typically takes 4 to 6 hours. Time may vary based on complexity and skill level. Planning and preparation can reduce construction time. Allocate extra time for painting or finishing details. Enjoy the process and create a customized piece for your home.
Can Beginners Build A Diy Toy Box?
Yes, beginners can build a DIY toy box with basic tools. Start with simple plans and follow step-by-step instructions. Gather all materials before starting. Watch tutorials for guidance and tips. Take your time and enjoy learning new skills. You’ll have a functional and creative toy box.
How Do I Personalize My Diy Toy Box?
Personalize your toy box with paint, stencils, or decals. Use vibrant colors or themes that match your child's interests. Add name plates or decorative handles for uniqueness. Personal touches make your toy box special and engaging. Get creative and let your imagination guide your design.
Conclusion
Creating your own toy box is fun and rewarding. You save money and gain a sense of achievement. DIY projects like this spark creativity and learning. Customize it to fit your space and style perfectly. Your children will cherish a toy box made by you.
It becomes a special piece in your home. Follow the steps carefully for a successful project. Enjoy the process and the result. Happy building and organizing!


