

Do It Yourself Diy Toy Organizer Ideas?
Are you tired of stepping on toys scattered across your living room floor? Feeling like your child's playtime has taken over every inch of your home?
You’re not alone. Many parents struggle with keeping toys organized and accessible. But what if you could turn this chaos into order with some creative DIY toy organizer ideas? Imagine a space where your child's toys are neatly arranged, easy to find, and even easier to put away.
These simple and cost-effective solutions not only bring harmony to your home, but they also teach your children the importance of tidiness. Plus, there’s something incredibly rewarding about creating your own storage solutions. You’ll be amazed at how these ideas can transform your space and make playtime more enjoyable for everyone. Get ready to explore innovative ways to organize toys that will help reclaim your home and sanity. Dive into the world of DIY and discover how small changes can make a big difference!
Benefits Of Diy Toy Organizers
Creating your own toy organizers saves money and sparks creativity. These projects also provide a fun bonding activity with kids. Personalize designs to fit any space, teaching children tidiness while engaging their imagination.
Creating your own toy organizers can transform your space and bring surprising benefits. Imagine a playroom where every toy has its place, and your child knows exactly where to find their favorite action figure or puzzle piece. DIY toy organizers not only make this possible but also offer unique advantages that make the effort worthwhile.
Cost-effective Solutions
Building your own toy organizers can save you money. Store-bought options can be pricey, but with a little creativity, you can repurpose materials you already have. An old bookshelf or a few wooden crates can become an efficient storage solution. Plus, you get the satisfaction of creating something useful and beautiful without breaking the bank.
Encourages Creativity And Personalization
DIY projects allow you to tailor organizers to fit your space and style. You can paint them in your child’s favorite colors or add decorations that reflect their interests. This not only makes the space more inviting but also encourages your child's creativity. They might even want to help with the design, making it a fun family activity.
Teaches Kids Organizational Skills
When kids participate in creating their own storage solutions, they learn valuable organizational skills. You can design organizers that are easy for them to use, such as open bins or low shelves. This way, they take responsibility for tidying up, understanding where everything belongs. It’s a simple yet effective way to teach them about order and responsibility.
Maximizes Space Efficiency
Every home is different, and DIY organizers can be customized to fit any space. Maybe your playroom has an awkward corner or a narrow hallway. You can design organizers that make the most of every inch. This ensures that even the smallest areas are functional and clutter-free, making your home more enjoyable for everyone.
Promotes Sustainability
By using recycled or upcycled materials, you contribute to a more sustainable environment. Turning old items into something new reduces waste. It’s an eco-friendly approach that teaches your children the importance of sustainability. They learn to see the potential in old items rather than simply throwing them away. Have you ever tried making your own toy organizer? What was your biggest challenge, and how did you overcome it?
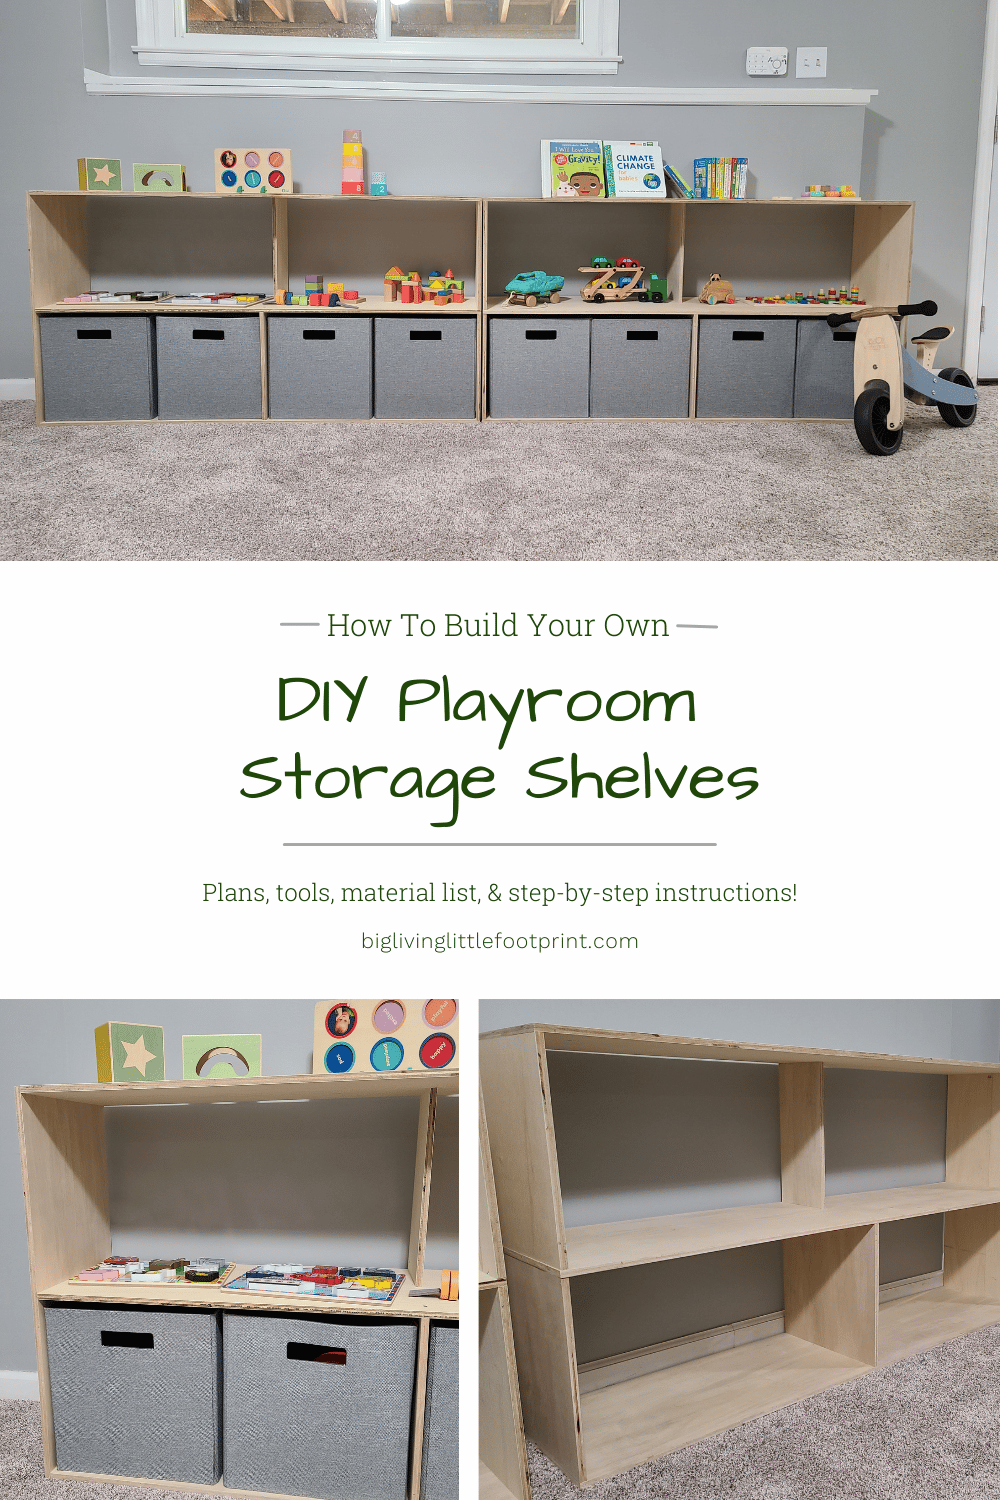
Credit: www.biglivinglittlefootprint.com
Materials To Consider
For DIY toy organizer ideas, choose sturdy materials like wood or plastic. Bright colors keep it fun. Consider using baskets or bins for easy sorting.
Creating a DIY toy organizer can be a rewarding project that not only declutters your space but also provides a fun activity to share with your family. Choosing the right materials is crucial to ensure the organizer is functional, durable, and aligns with your values. Let's dive into some materials you might consider, based on sustainability and budget.
Sustainable Choices
If you care about the environment, selecting sustainable materials can make your DIY project more eco-friendly. Consider using reclaimed wood from old furniture or pallets. It adds a rustic charm to your toy organizer and helps reduce waste. Bamboo is another great option. It's a fast-growing renewable resource that's both strong and lightweight. Using bamboo can give your project a modern look while keeping your carbon footprint low. You might also explore recycled materials such as plastic or metal. These can be found in thrift stores or recycling centers, providing you with unique items that can be repurposed creatively.
Budget-friendly Options
Creating a toy organizer doesn't have to break the bank. Cardboard boxes are an excellent budget-friendly choice. They're easy to find, and you can decorate them with paint or wrapping paper to match your child's room. Fabric bins can be another cost-effective solution. They're flexible, which makes them easy to fit into tight spaces. Plus, with a little sewing know-how, you can customize them to suit your taste and needs. Plastic crates or bins are affordable and widely available. They stack well, offering a practical solution for organizing toys. Consider checking local community groups for free or cheap options. What materials will you choose for your toy organizer? Whether sustainable or budget-friendly, each option offers a unique way to personalize your space.
Diy Shelving Units
Creating a DIY shelving unit for toy organization offers great flexibility. You can tailor it to fit your space and style. These shelves can transform chaotic play areas into neat, organized zones. They also encourage children to keep their toys tidy, making cleanup a fun task.
Repurposing Old Furniture
Use old furniture to create unique toy shelves. An outdated bookshelf can serve as a perfect organizer. Clean and sand the surface for a fresh start. Apply a coat of vibrant paint to match your child’s room. Add decorative baskets or bins on shelves for easy sorting.
Old dressers can work wonders, too. Remove drawers and insert colorful boxes or crates. Each box can hold different types of toys. This adds both functionality and a splash of color to the room.
Building From Scratch
Building shelves from scratch allows for complete customization. Use simple wooden planks and brackets to start. Cut the planks to desired lengths. Secure them to the wall at varying heights for a fun look.
Paint the shelves in bold, contrasting colors. This makes each shelf pop. Consider adding hooks underneath for hanging toys. This maximizes storage space and keeps the floor clear.
Create a ladder-style shelf for a stylish touch. Lean it against the wall and use the rungs for storage. Attach small baskets or fabric bins to hold toys securely.

Credit: www.anikasdiylife.com
Creative Storage Bins
Organizing toys can be fun with creative storage bins. These bins not only store toys but also add charm to the room. From decorative containers to upcycled boxes, the options are endless. Let's explore some innovative ideas to keep the playroom tidy and stylish.
Decorative Containers
Decorative containers bring a touch of style to toy organization. Choose bold colors or patterns for a playful look. Opt for containers with lids to keep toys dust-free. Baskets woven with bright threads offer a lively, textured feel. Clear bins with decals allow kids to see what's inside easily. Large, painted buckets can be personalized with names or themes.
Mix and match sizes for various toy types. Stacking bins save space and create visual interest. Consider transparent bins with colored lids for a fun contrast. Use labels on each container to make toy sorting simple. Decorative containers blend functionality with aesthetics beautifully.
Upcycled Boxes
Upcycled boxes offer a sustainable way to store toys. Transform cardboard boxes with paint or fabric for a fresh look. Old shoe boxes make perfect organizers for small toys. Use wallpaper remnants to cover boxes for unique designs. Turn cereal boxes into nifty storage by strengthening them with duct tape.
Use leftover gift wrap to decorate boxes creatively. Add wheels to larger boxes for mobile storage solutions. Utilize wooden crates from fruits or vegetables for sturdy storage. Customize the look with stickers or drawings. Upcycled boxes are eco-friendly and versatile for any playroom.
Wall-mounted Solutions
Are you tired of toys cluttering every corner of your home? Wall-mounted solutions could be your savior. These clever ideas not only help you save space but also keep your child's play area organized and tidy. Let's dive into some easy DIY options that will transform your walls into functional, stylish toy organizers.
Pegboards And Hooks
Pegboards can be a game-changer for toy organization. They offer a versatile platform where you can easily add hooks, baskets, and shelves. This flexibility allows you to customize the setup based on your child's evolving toy collection.
Start by mounting a pegboard on an accessible wall in the playroom. Choose colorful hooks to add a playful touch. Hang toys that have handles or holes, like toy guitars or buckets, directly on the hooks.
If you have smaller toys, consider adding small baskets or cups to the pegboard. This way, you can keep items like puzzle pieces or building blocks organized and easy to find. It's quick and efficient, and your kids can help put things away!
Hanging Baskets
Hanging baskets are a fantastic option for storing toys in a compact, organized manner. They are perfect for plush toys, dolls, or action figures that can quickly clutter floors and shelves.
You can attach sturdy baskets to the wall using hooks or brackets. Arrange them at varying heights to make it easier for children to access their favorite toys. This not only encourages independence but also keeps toys off the ground.
Consider transparent baskets, so your child can see what's inside without emptying everything onto the floor. It’s a simple yet effective solution that can make clean-up time a breeze. Plus, it adds a fun, decorative touch to the room!
What other creative ways can you think of to organize toys on your walls? The possibilities are endless, and the rewards are priceless—a tidy, inviting play space for your children.
Multi-purpose Furniture
Multi-purpose furniture offers a smart solution for toy organization. It maximizes space while adding style to your home. These pieces serve more than one function, making them ideal for small spaces.
Explore options that cater to both storage and everyday use. This approach keeps toys accessible and neatly stored.
Ottomans With Storage
Ottomans with storage provide hidden compartments. They offer a comfy seat or footrest. Lift the top to reveal ample space inside. Store plush toys, games, or books effortlessly.
Choose designs that match your decor. Some ottomans come in various colors and textures. They blend with any room setting.
Convertible Tables
Convertible tables adjust to your needs. They serve as a play table or a desk. Their design includes storage areas beneath the surface.
Store toys and crafts in these built-in compartments. When not in use, fold them for extra floor space. This makes them ideal for compact rooms.
Pick tables with simple mechanisms. This ensures easy conversion between functions.
Labeling And Organization Tips
Create a fun and organized play space with DIY toy organizers. Use clear labels for easy sorting and finding. Keep toys accessible by arranging them in bins or boxes.
Organizing your child's toys can feel like a never-ending battle. However, effective labeling and organization can transform chaos into order. By implementing creative and practical labeling strategies, you make it easier for your child to find and put away toys. This not only keeps your space tidy but also teaches your child responsibility and independence.
Color-coding Strategies
Color-coding is a game-changer for organizing toys. Assign a color to each category of toys. For example, use red for puzzles, blue for building blocks, and yellow for art supplies. This visual cue helps even young children understand where each toy belongs. Imagine walking into a room where each bin is a rainbow of organization. This method can also make clean-up time a fun game—ask your child to "find the red bin" or "put all the blue toys away." Color-coding simplifies the process and makes it more engaging for your little one.
Easy-to-read Labels
Labels are essential for a clear and organized toy system. Use large, bold fonts that are easy for children to read. Consider using both words and pictures on the labels, especially for younger kids who are not yet reading. Think about using clipart or photos of the actual toys on the labels. This visual reference helps children quickly identify where each toy goes. You could also use a label maker for a neat and uniform look, but handwritten labels add a personal touch and involve your child in the process. Implementing these strategies ensures that your DIY toy organizer is functional and kid-friendly. What labeling tips have you found effective in your home? Share your experiences and let's create spaces where creativity can flourish without the clutter!

Credit: jennaburger.com
Involving Kids In The Process
Involving kids in organizing their toys can be a rewarding experience. It teaches them essential skills while making the process fun. By engaging them in DIY projects, you create lasting memories. Kids feel a sense of accomplishment and ownership. They learn to care for their belongings and develop creativity.
Fun Crafting Activities
Turn organizing into a playful craft session. Use colorful papers and stickers for decoration. Let kids create labels for toy bins. Craft simple boxes from recycled materials. Encourage them to paint or draw designs. This activity sparks their imagination and creativity. It gives them a chance to personalize their space.
Teaching Responsibility
Involve kids in sorting and categorizing toys. Show them how to decide what goes where. Explain the importance of keeping toys tidy. Teach them to return toys to their designated spots. This builds a habit of responsibility and care. They learn to manage their own play area. It instills a sense of pride in their work.
Frequently Asked Questions
How Can I Organize Toys On A Budget?
Organizing toys on a budget involves using creative DIY solutions. Repurpose items like shoe boxes, baskets, or bins for storage. Label containers to maintain order and make cleanup fun. Use wall-mounted shelves or hooks to save space. Explore thrift stores for affordable organizing items.
These methods help save money and declutter.
What Materials Are Best For Diy Toy Organizers?
For DIY toy organizers, choose durable, safe materials. Wooden crates, canvas bins, and plastic containers are great options. Ensure materials are non-toxic and sturdy for safety. You can also repurpose cardboard boxes or fabric totes. These materials provide longevity and flexibility for various toy types.
How Do I Make A Toy Organizer?
To make a toy organizer, start by selecting materials like crates or baskets. Determine the size based on your space and toy collection. Assemble using glue, nails, or screws. Customize with paint or labels for a personal touch. Ensure it's sturdy and accessible for children, promoting easy use and tidiness.
What Are Some Space-saving Toy Storage Ideas?
Space-saving toy storage ideas include using vertical space with shelves or wall-mounted bins. Opt for under-bed storage boxes or stackable containers. Multi-purpose furniture like ottomans with storage can also help. Hanging organizers or over-the-door pockets maximize small spaces. These solutions keep toys organized without taking up much room.
Conclusion
Creating your own toy organizer can be fun and rewarding. It saves money and personalizes your space. Simple materials like boxes or baskets work well. Kids learn to keep toys tidy. Plus, crafting together strengthens family bonds. You get organized, and kids enjoy their toys more.
Try one idea or mix them up. The result? A clutter-free, joyful play area. Enjoy crafting, organizing, and spending quality time with family. Dive into your DIY project today! Your creativity will shine, and your home will thank you.


