


Are your kids' plastic outdoor toys starting to look a little worse for wear? Maybe the vibrant colors have faded, or the toys have collected scratches and scuffs over time.
Don't worry; you don't have to toss them out just yet! With a little creativity and some paint, you can breathe new life into those beloved toys and make them look brand new again. Imagine the excitement on your child's face when their favorite playthings are transformed into colorful masterpieces.
In this guide, you'll discover how easy it is to paint plastic outdoor toys, giving them a stunning makeover while also ensuring they withstand the elements. Get ready to unleash your inner artist and give those toys a vibrant new look that will captivate your children all over again. Keep reading to learn the secrets to successful painting, ensuring your kids' playtime is as colorful and joyful as it can be!
Choosing The Right Paint
Selecting the right paint for plastic outdoor toys ensures durability and vibrant colors. Opt for paints designed for plastic surfaces, providing long-lasting protection against weather and wear. Clean and dry toys thoroughly before painting for the best results.
Choosing the right paint is crucial when you're looking to give your plastic outdoor toys a fresh look. The wrong paint can peel off quickly, leaving your efforts in vain. On the other hand, the right choice can make your toys vibrant and long-lasting. Have you ever spent hours painting only to see your hard work fade away? To avoid this, let's dive into the specifics of choosing the best paint for your project.
Types Of Paint For Plastic
Not all paint adheres well to plastic surfaces. You need something designed specifically for it. Acrylic Paint: Often used for its quick-drying properties, it's not always the best for plastic unless it states it's suitable for such surfaces. Enamel Paint: Known for durability, this is a better option for plastic as it provides a smooth, long-lasting finish. Spray Paint for Plastic: This is often the easiest and most effective choice. Brands like Rust-Oleum and Krylon offer spray paints specifically made for plastic surfaces. Choosing the right type ensures your paint job won't chip or peel easily. Always read the label to confirm it's meant for plastic.
Weather-resistant Options
Outdoor toys are constantly exposed to the elements. Rain, sun, and wind can all take a toll. Look for paints labeled as weather-resistant. These paints contain UV protectants that help maintain color vibrancy, even under direct sunlight. Some brands offer water-resistant properties to prevent rain damage. Have you considered the local climate in your area? If your region experiences heavy rainfall, prioritize water-resistant options. In sunny areas, UV protection is a must. Remember, the goal is to keep your toys looking fresh and new. Choosing weather-resistant options can save you from repainting frequently. By selecting the right paint, you not only beautify your toys but also extend their life. It's about making informed choices that save time and effort in the long run. What will you choose for your next painting project?
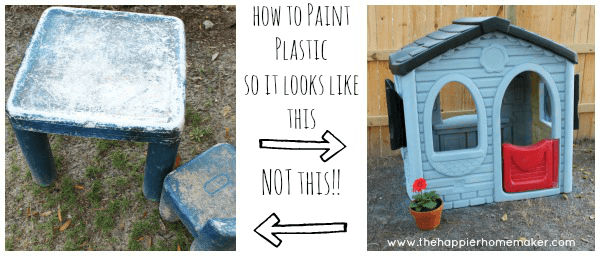
Credit: thehappierhomemaker.com
Preparing The Surface
Transforming old plastic outdoor toys into vibrant play items is rewarding. Proper surface preparation ensures the paint sticks well and lasts longer. Preparing the surface involves cleaning and sanding. These steps are crucial for a smooth finish.
Cleaning The Toys
Start with a thorough cleaning. Dirt and grime can affect paint adhesion. Use warm water mixed with mild soap. Scrub the toys gently with a soft cloth or sponge. Pay attention to crevices and corners. Rinse off all soap residue with clean water. Let the toys air dry completely before moving to the next step.
Sanding For Better Adhesion
Sanding helps the paint stick better. Use fine-grit sandpaper for this task. Lightly sand the toy's surface in circular motions. This creates a slightly rough texture for the paint to cling to. Avoid sanding too hard to prevent damage. Wipe away any dust with a damp cloth. Ensure the toys are dry before painting.
Gathering Essential Tools
Gather the right tools for painting plastic outdoor toys. Essential items include sandpaper, primer, and spray paint. Choose outdoor-safe products for durability.
Gathering essential tools is crucial before painting plastic outdoor toys. With the right tools, the process becomes easier and more efficient. This section will guide you on what tools to have. Ensure a smooth painting experience and achieve a neat finish.
Brushes And Rollers
Choose brushes and rollers designed for smooth surfaces. They help apply paint evenly on plastic toys. A small brush reaches tight spots and details. A roller covers larger areas quickly. Look for high-quality materials to avoid shedding bristles. This ensures a clean application without unwanted debris.
Protective Gear
Safety is key when painting. Wear protective gear to safeguard yourself. Use gloves to protect your hands from paint and chemicals. A mask prevents inhaling harmful fumes. Goggles shield your eyes from splashes. Choose comfortable gear for ease of movement. Always prioritize safety during your painting project.

Credit: www.lillepunkin.com
Applying Primer
Priming is crucial for painting plastic outdoor toys. It helps paint stick better and last longer. Ensure the surface is clean and dry before applying primer to achieve a smooth finish.
Applying primer is a crucial step in painting plastic outdoor toys. It ensures the paint sticks well and lasts longer. Without primer, paint may peel or chip easily. Priming prepares the surface and enhances the paint's durability. This step is essential for a smooth and lasting finish.
Benefits Of Priming
Priming offers several advantages for painting plastic toys. It creates a smooth base. This helps the paint adhere better. The primer also seals the plastic, preventing peeling. It enhances the paint's color, making it vibrant. Priming reduces the number of paint coats needed. It saves time and effort. Overall, it improves the paint's longevity.
How To Apply Primer
Start with a clean surface. Wash the toys with soap and water. Let them dry completely. Choose a primer suitable for plastic. Shake the primer can well. Hold the can about 12 inches from the toy. Spray in even, light coats. Avoid heavy layers to prevent drips. Let each coat dry before applying the next. Usually, one or two coats are enough. Ensure the primer is fully dry before painting. This ensures the best results.
Painting Techniques
Transform your plastic outdoor toys with vibrant paint techniques. Begin by cleaning and sanding surfaces for better paint adherence. Choose suitable plastic-friendly paint, apply in thin coats, and let dry thoroughly.
Painting plastic outdoor toys can breathe new life into them, making them look vibrant and new again. Whether you're sprucing up a faded slide or adding a splash of color to a swing, mastering the right painting techniques is crucial. Choosing between spray painting and brush painting depends on the type of toy and the finish you're aiming for. Let's dive into the specifics of each method to help you decide which is best for your project.
Spray Painting Tips
Spray painting is often the go-to method for covering larger surfaces quickly. It's efficient and provides a smooth, even finish. Before you start, make sure the toy is clean and dry. Dirt and moisture can ruin the paint job. Use a primer that is suitable for plastic surfaces. This helps the paint adhere better. Always spray in a well-ventilated area to avoid inhaling fumes. Hold the spray can about 6-12 inches away from the toy to prevent drips and ensure an even coat. Apply multiple thin layers instead of one thick one. This prevents runs and bubbles. Let each layer dry completely before applying the next. It might take some patience, but the results will be worth it.
Brush Painting Methods
Brush painting offers more control, which is perfect for small toys or intricate details. Choose a paint that is specifically made for plastic surfaces to ensure durability. A high-quality brush can make a big difference in the final look. Before you start, clean the toy thoroughly and let it dry. Dip your brush lightly in the paint and apply thin coats. Thick layers can lead to uneven drying and a clumpy finish. Use smooth, even strokes to cover the surface. Allow each coat to dry completely before applying another. This method might take longer, but it allows for creativity and precision. Have you ever painted a toy and been amazed at the transformation? Whether you choose spray or brush, the key is patience and attention to detail. Which method will you try for your next painting project?

Credit: www.pinterest.com
Drying And Curing
Drying ensures paint adheres properly to plastic toys. Curing strengthens the bond between paint and surface. Proper drying and curing prevent chipping and fading, extending the toy's lifespan.
Drying and curing are crucial steps when painting plastic outdoor toys. They ensure that the paint adheres properly and lasts longer. Skipping or rushing through these stages can lead to peeling and fading. Let’s explore how you can master the drying and curing process to achieve a smooth, durable finish.
Optimal Drying Conditions
Choosing the right environment for drying is essential. Ideally, you should dry the toys in a well-ventilated area. This helps the paint dry evenly and reduces the risk of bubbles. Humidity can affect drying time. On a humid day, paint can take longer to dry. If you're working outdoors, aim for a sunny day with low humidity. Temperature also plays a role. A moderate temperature, around 65-75°F (18-24°C), is perfect for drying paint. Too hot, and the paint may crack; too cold, and it might not dry at all.
Curing Time Considerations
Curing is different from drying. While drying is the surface becoming touchable, curing is when the paint fully hardens. This can take several days. Most paints require at least 24-48 hours to cure. Check the paint can for specific guidelines. Some may suggest a longer time, especially for outdoor use. You might be tempted to play with the toys soon after they seem dry. Resist this urge. Waiting for full curing ensures the paint won't chip or peel during playtime. Have you ever touched up a spot too soon, only to have it smudge? It's a common mistake. Being patient during curing can save you from having to redo your work. When planning your painting project, consider curing time. Think about when the toys will be needed next. This ensures you're not rushing the process and compromising the results. By focusing on drying and curing, you ensure your painted toys look vibrant for years. What steps will you take to enhance your painting process?
Adding Finishing Touches
Painting plastic outdoor toys can refresh their look. The final touches are crucial for a lasting finish. These steps ensure your toys not only look great but also withstand outdoor elements. Let's delve into the details of these finishing touches.
Sealing For Longevity
Sealing painted toys protects them from sun and rain damage. Choose a sealant that's compatible with your paint type. A clear spray sealant works well for most projects. Apply the sealant in light, even coats. Allow each layer to dry completely before adding another. This process ensures a smooth, durable finish. Sealing not only protects but also enhances color vibrancy.
Decorative Accents
Decorative accents add personality to your painted toys. Use stencils for patterns or shapes. Stickers can offer a quick decorative touch. Ensure the paint is fully dry before adding accents. Use contrasting colors for a striking effect. These small details make toys unique and visually appealing. Always seal over any accents for added protection.
Maintenance Tips
Maintaining the vibrant look of your painted plastic outdoor toys is crucial. Regular care keeps them looking new and extends their lifespan. Below are some practical tips to ensure your toys remain in top condition.
Regular Cleaning Routine
Clean your toys regularly to prevent dirt build-up. Use a mild detergent mixed with warm water. Gently scrub the surface with a soft brush. Rinse thoroughly with clean water. Allow the toys to air dry completely. This simple routine prevents stains and keeps colors bright.
Touch-up Techniques
Scratches and chips can occur over time. Touching up these imperfections is easy. First, clean the area to remove any debris. Lightly sand the scratched area. This helps the paint adhere better. Choose a matching paint for touch-ups. Apply the paint with a small brush or spray. Allow the paint to dry fully. Touch-ups keep your toys looking fresh and well-maintained.
Frequently Asked Questions
Can I Use Any Paint On Plastic Toys?
No, you need paint specifically made for plastic surfaces. Regular paint may not adhere well to plastic. Look for spray paints designed for plastic or outdoor surfaces. These paints offer better durability and resistance to weather conditions.
How Do I Prepare Plastic Toys For Painting?
Start by cleaning the toys thoroughly to remove dirt and grease. Use soap and water, then dry completely. Sand the surface lightly to create a texture for better paint adhesion. Applying a plastic primer can also help the paint stick better.
Is It Necessary To Prime Plastic Toys Before Painting?
Yes, priming is recommended for better adhesion and durability. Primer creates a smooth base for paint and helps it stick to the plastic. Choose a primer designed for plastic surfaces and apply it evenly before painting.
How Long Does Paint On Plastic Toys Last?
Paint on plastic toys can last several years with proper preparation and maintenance. Using quality plastic-specific paint and primer improves longevity. Regular cleaning and storing toys indoors during harsh weather also help extend the paint's lifespan.
Conclusion
Painting plastic outdoor toys can be a fun project. It brightens your garden and keeps toys looking new. Remember to clean the toys first. Choose a paint suitable for plastic surfaces. Use primer for better paint adhesion. Apply coats evenly for a smooth finish.
Let the paint dry fully before use. Your efforts will make the toys attractive and long-lasting. Enjoy the refreshed look of your outdoor space. With these tips, painting becomes easy and rewarding. Kids will love playing with the colorful toys.
Start your painting project and transform the play area today!


