


Imagine the joy on your child’s face when they see a brand-new toy box, crafted with love by you. A DIY toy box is not just a storage solution; it’s a fun project that adds a personal touch to your child’s room.
You don’t need to be a seasoned carpenter to build one. With a few tools and a little creativity, you can create a toy box that’s both functional and stylish. In this guide, you’ll discover simple steps to build a toy box that organizes toys and sparks joy.
Ready to transform your playroom into a tidy and playful haven? Let’s dive in!
Materials Needed
Creating a DIY toy box requires the right materials. These materials ensure the box is sturdy and safe. Gathering the correct supplies is the first step. It sets the foundation for a successful project. With the right materials, your toy box will last long. Plus, it will look great in any room.
Wood Panels
Choose durable wood panels. Pine or plywood works well. Ensure the panels are smooth. This prevents splinters. Measure the panels to fit the desired size. Cut them accurately for a perfect fit.
Wood Screws
Use wood screws to secure the panels. They hold the structure together. Pick screws that are the right length. Short screws might not hold. Long screws can damage the wood.
Sandpaper
Sandpaper smooths rough edges. It prepares the wood for painting or staining. Choose medium to fine grit sandpaper. Sand all surfaces evenly. This step ensures a polished finish.
Wood Glue
Wood glue provides extra strength. Apply it where panels meet. Ensure the glue is spread evenly. Press the panels together until the glue sets. This adds stability to your toy box.
Hinges
Hinges attach the lid to the box. Choose sturdy metal hinges. They should open and close smoothly. Install them securely. This ensures the lid operates safely.
Paint Or Wood Stain
Paint or stain adds color. It also protects the wood. Choose a non-toxic option. This is important for children’s safety. Apply evenly for a professional look.
Paintbrushes Or Rollers
Use brushes for detailed areas. Rollers cover large surfaces quickly. Ensure they are clean. This prevents streaks or clumps. Always follow the grain of the wood.
Handles
Handles make the toy box easy to move. Choose ones that suit your style. Ensure they are securely attached. This adds both function and flair.

Credit: www.etsy.com
Choosing The Right Wood
Selecting the correct wood is crucial for a sturdy toy box. It influences durability and aesthetics. Your choice impacts the box’s longevity and safety. A well-chosen wood enhances the toy box’s appearance.
Types Of Wood To Consider
Pine is affordable and easy to find. It’s light and simple to work with. Oak offers strength and durability. It has a classic look that many love. Plywood is another good option. It’s cost-effective and versatile. Ensure it’s of high quality for safety.
Wood Quality Matters
High-quality wood ensures a safer toy box. It withstands wear and tear. Inspect the wood for knots and cracks. These can weaken the structure. Smooth surfaces protect little hands from splinters.
Environmental Considerations
Opt for sustainably sourced wood. It supports environmental protection efforts. Look for certifications like FSC. These guarantee responsible sourcing. Protecting the planet is always important.
Cost Versus Quality
Balance cost and quality for your project. Cheaper wood may need more repairs. Invest in better wood for fewer future issues. Your budget should reflect long-term needs.
Designing The Toy Box
Designing the toy box is an exciting part of your DIY journey. This is where you get to unleash your creativity and tailor the box to fit your child’s needs and your home’s style. It’s not just about putting together a simple box; it’s about crafting a piece that is both functional and appealing. As you dive into the design phase, think about how you can make the toy box a perfect fit for your space.
Size And Dimensions
Start by measuring the area where the toy box will live. You want to ensure it fits comfortably without overwhelming the room. Consider how much storage you need. Are you looking for a compact box to tuck away in the corner, or a larger one that can double as a bench?
Think about your child’s age and size. A box that’s too tall might be challenging for younger kids to reach inside. On the flip side, a box that’s too small might quickly overflow with toys. Balancing these factors will help you decide on the ideal dimensions.
Style And Features
Style is where you can let your personality shine. Do you prefer a classic wooden look, or something more colorful and modern? Maybe your child loves superheroes or animals, and you could incorporate those themes into the design.
Consider practical features like safety hinges to prevent little fingers from getting pinched. A toy box with wheels can be convenient for moving around during playtime. Adding dividers inside can help organize toys by type or size, making cleanup easier.
As you plan the style and features, think about how they fit your family’s lifestyle. Does the toy box need to withstand energetic play or blend seamlessly with your living room decor? By addressing these questions, you’ll create a toy box that is both functional and beautiful.
Tools Required
To create a DIY toy box, gather essential tools such as a hammer, saw, screwdriver, and measuring tape. Sandpaper smooths surfaces, while nails and screws secure parts. A drill assists in assembling sturdy joints.
Building a DIY toy box can be a rewarding experience, giving you a chance to flex your creative muscles while crafting something practical for your home. Before you dive into this fun project, it’s essential to gather the right tools. Having the right tools not only makes your work easier but also ensures a sturdy and safe toy box for your little ones. Let’s walk through the essential tools you’ll need, sprinkled with some personal insights and tips to make the process smoother.Basic Hand Tools
Start with the basics. A tape measure is crucial to ensure all your cuts and dimensions are accurate. An error here could mean parts not fitting together properly. It’s a good idea to have a set of screwdrivers on hand. Both flat-head and Phillips are useful for assembling parts and attaching hinges. When I built my first toy box, I quickly realized the importance of a good hammer. A lightweight hammer makes nailing both easier and more precise.Power Tools
Power tools can significantly speed up your project. A power drill is indispensable for creating pilot holes and driving screws. It saves time and effort compared to manual screwing. If you have access to a jigsaw or circular saw, these tools are perfect for cutting large sheets of wood. Using a jigsaw, I was able to create curved edges for my toy box, adding a personal touch that flat cuts couldn’t achieve.Safety Gear
Safety should always be a priority. Wearing safety goggles protects your eyes from flying debris, especially when cutting or drilling. A pair of work gloves can prevent splinters and blisters. I learned this the hard way when a small wood chip lodged into my hand. A dust mask is also a good idea, particularly if you’re working with MDF or treated wood that may produce harmful dust.Measuring And Marking Tools
Precision is key in any DIY project. A speed square helps with marking straight lines and ensuring right angles. Use a pencil for marking—it’s easy to erase if you make a mistake. I often use a level to ensure all pieces are aligned correctly before assembly. This step can prevent the frustration of a wobbly toy box.Clamps And Fasteners
Clamps are essential for holding pieces together while you work. They act as an extra set of hands, which can be a game-changer. I remember struggling with aligning pieces until I invested in a good set of clamps. Don’t forget the fasteners—screws and nails are the backbone of your project. Having a variety of sizes ensures you can tackle different parts of the build efficiently. Are you ready to gather these tools and start building? Each tool plays a crucial role, and having them ready before you begin can save you from mid-project frustration. What unique feature will you add to your toy box to make it truly yours?Cutting The Wood
Building a DIY toy box is a rewarding project. Cutting the wood is a critical step in creating a sturdy toy box. Precision in this step ensures a durable and appealing final product. Follow these simple instructions for successful wood cutting. Begin with measuring and marking, keeping safety in mind.
Measuring And Marking
Accurate measurements are key. Use a tape measure to determine dimensions. Mark your measurements on the wood with a pencil. Ensure straight lines for clean cuts. A square tool helps maintain right angles.
Double-check measurements before cutting. Mistakes can waste materials. Consistency in measuring avoids errors. Maintain focus during this step.
Safety Tips
Wear protective gear. Safety goggles protect eyes from wood chips. Gloves guard against splinters. Keep your workspace organized. A clutter-free area reduces accidents.
Use tools correctly. Follow manufacturer instructions for safe operation. Ensure blades are sharp for efficient cutting. Avoid distractions while working with tools.
Safety is a priority. Focus on safe practices for a successful project.
Assembling The Parts
Gather wooden panels, screws, and hinges to start building your DIY toy box. Assemble the pieces carefully, ensuring each part fits snugly. A stable base and secure lid will keep toys safe and organized.
Assembling the parts of your DIY toy box is where the magic truly begins. This is the stage where your vision starts to take shape. With your materials ready, it’s time to bring your toy box to life. Follow these guidelines to ensure a sturdy and long-lasting creation.Joining Techniques
Choosing the right joining techniques is crucial. You want your toy box to be robust and safe for kids. Consider using wood screws or nails for a classic approach. Wood glue can add extra strength, especially on edges and corners. Some builders prefer using dowels or biscuit joints for a cleaner look. Each method has its benefits, so choose what feels right for your project.Securing The Structure
Once the parts are joined, securing the structure comes next. Make sure everything is aligned properly before tightening screws or adding glue. A misaligned piece can lead to a wobbly toy box. Use clamps to hold pieces in place as they dry. This ensures the joints remain tight and secure. Have you ever had a piece come loose after assembly? Clamps can prevent that frustration. Double-check all connections and give the toy box a gentle shake. It should feel solid and stable. If it wobbles, inspect and reinforce the weak spots. A secure toy box means peace of mind for you and endless playtime for your kids. Building a DIY toy box isn’t just about function; it’s a chance to create something personal and meaningful. What story will your toy box tell?Adding Hinges And Handles
Attach hinges to the toy box lid for easy opening and closing. Secure handles to each side for convenient carrying. These additions enhance functionality and style, making the toy box both practical and appealing for children and parents alike.
Adding hinges and handles to your DIY toy box is a crucial step. These components not only enhance the functionality but also add a touch of style. Imagine the convenience of a lid that opens smoothly and handles that make moving the box a breeze. Let’s dive into how you can choose the right hardware and install it with ease.Choosing The Hardware
When choosing hinges and handles, consider durability first. You want pieces that can withstand regular use, especially if your toy box is for energetic kids. Look for materials like stainless steel or brass that resist rust and wear. Think about the style that matches your toy box. Classic metal handles can give a timeless look, while colorful plastic ones might add a playful touch. If your toy box has a specific theme, coordinate the hardware to complement it. Size matters, too. Ensure the hinges and handles are proportionate to your toy box. Oversized hardware can overwhelm the design, while too-small options might not offer the functionality you need.Installation Process
Begin by marking where the hinges will go. Evenly spaced hinges ensure the lid opens smoothly. A good tip is to measure twice to avoid mistakes that could lead to a crooked lid. Drill holes where you’ve marked for the hinges. Use screws that come with the hinges or ones that match in size and material. Tighten them securely so the lid stays in place without wobbling. For handles, position them where they’re comfortable to grip, usually on the front side of the box. Make sure they are aligned horizontally. This small detail can make a big difference in the overall look and usability. Consider adding a safety feature like a soft-close hinge if your toy box is for young children. This prevents the lid from slamming shut and keeps little fingers safe. Safety doesn’t have to compromise style. Does your DIY toy box reflect your personal style and needs? Personal touches like choosing the right hardware make it uniquely yours and ensure it serves its purpose effectively.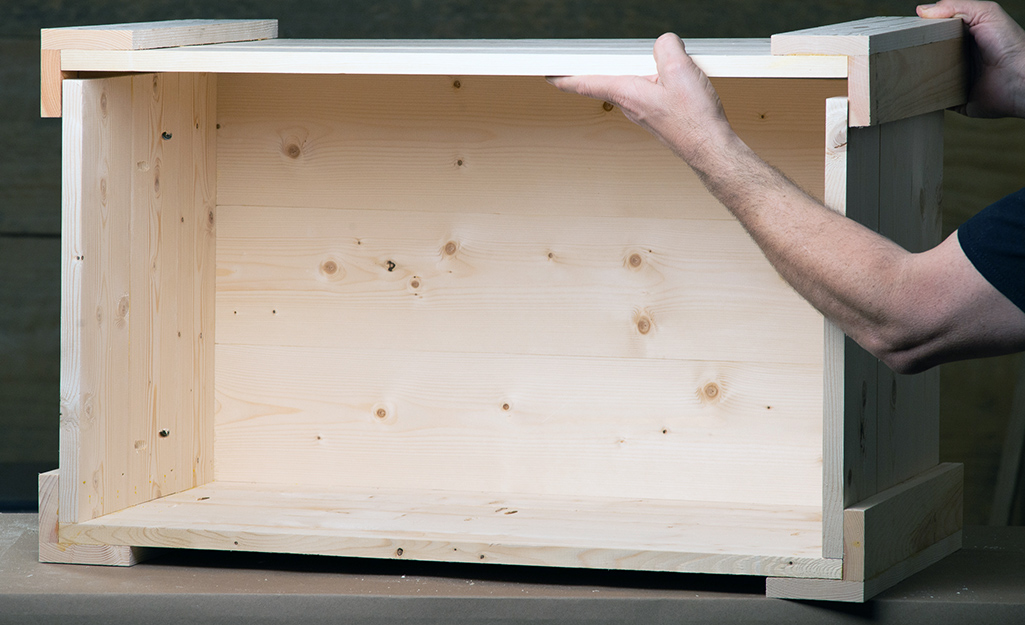
Credit: www.homedepot.com
Painting And Finishing
Discover the joy of crafting a toy box with a personal touch. Start by painting the wood in vibrant colors. Finish with a protective sealant for lasting durability.
Painting and finishing your DIY toy box can turn a simple storage solution into a statement piece for your child’s room. The right paint and finish not only enhance the aesthetic but also protect the wood from wear and tear. This step is where creativity meets functionality, and it’s important to get it right.Selecting Paints
Choosing the right paint for your toy box involves more than just picking your child’s favorite color. Consider using non-toxic, water-based paints to ensure safety, especially if your little one is prone to chewing on things. Look for durable options that can withstand scratches and spills; chalk paints can be a great choice for their matte finish and easy application. Do you want a vibrant, playful color or something more neutral? Think about how the toy box will fit into the overall theme of the room. Test a small area first to see how the paint looks once dry, as it might appear different than expected.Applying Finishes
After painting, adding a finish is crucial to protect your masterpiece. A clear polyurethane coat can offer an extra layer of protection and is relatively easy to apply. Opt for a satin or semi-gloss finish to achieve a subtle sheen without being too glossy. Apply the finish with a foam brush for an even coat, and let it dry completely before use. Remember to sand lightly between coats if you choose to apply multiple layers. This not only helps the finish adhere better but also ensures a smooth, professional look. Have you ever painted a piece of furniture only to see it chip away over time? A good finish can prevent this, ensuring your toy box remains a cherished part of your child’s room for years.Decorating The Toy Box
Crafting a DIY toy box is a fun and easy project for any parent. Choose sturdy materials like wood or plastic. Paint with vibrant colors and add playful designs for a personalized touch.
Decorating the toy box can be the most exciting part of your DIY project. It’s where you can let your creativity run wild and truly make the toy box stand out. Adding personal touches not only makes the toy box unique but also gives it a sentimental value that both you and your child will cherish.Creative Ideas
Consider using bright colors to make the toy box visually appealing for children. You can paint the box in your child’s favorite color or use a mix of colors for a fun look. Using stencils can add an artistic touch without needing advanced painting skills. Choose shapes like stars, hearts, or even animal patterns to decorate the surface. Decals and stickers offer an easy way to decorate. They come in countless designs and are simple to apply. Plus, they can be changed as your child’s interests evolve.Personalization Tips
Personalizing the toy box can make it feel extra special. Add your child’s name using wooden letters or decals. This not only personalizes the box but also helps in teaching them to recognize their name. You might want to include a chalkboard section on the toy box. This allows kids to draw and express themselves, making the toy box more interactive. How about making your child a part of the decoration process? Let them choose some stickers or colors. It makes the project more engaging and helps them feel proud of their toy box. When decorating, think about what makes your child happy. Is there a beloved cartoon character or a favorite hobby? Incorporating these elements can make the toy box a treasured item in their room. Are you ready to let your creativity shine? What unique ideas will you add to your DIY toy box?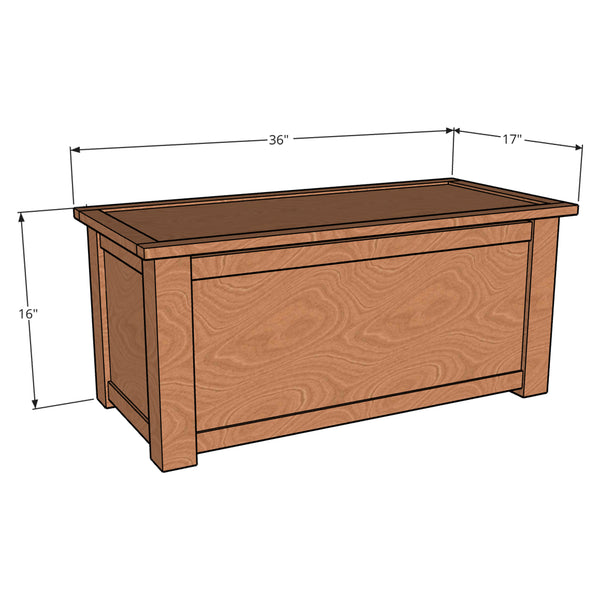
Credit: shopangelamariemade.myshopify.com
Maintenance Tips
Creating a sturdy toy box requires regular upkeep. Keep hinges and screws tightened for safety. Clean surfaces with mild soap to preserve the finish.
Building a DIY toy box is a rewarding endeavor, but ensuring it lasts requires proper maintenance. You might think the hard part is over once the box is built, but regular upkeep is crucial. Just imagine the joy on your child’s face when they open a clean, well-maintained toy box every time.Cleaning And Care
Keeping your toy box clean isn’t just about aesthetics; it’s about health and longevity. Dust and dirt can accumulate quickly, leading to wear and tear. Regular dusting helps prevent this buildup. Consider using a mild soap solution for a deeper clean. Wipe the surfaces gently with a damp cloth to remove any stubborn stains. Allow it to dry completely to avoid moisture damage. Think about setting a monthly schedule for cleaning. Involve your kids by turning it into a fun game. Who knew cleaning could be a bonding activity?Repairing Damages
Even the most robust toy boxes can suffer damages. Imagine the scenario: a toy box lid suddenly comes off, making it unsafe. Swift repairs are vital to prevent further issues. Keep a small toolkit handy for minor repairs. Tighten loose screws and check hinges regularly. Replacing broken parts promptly can save you time and money in the long run. Have you ever thought about adding some reinforcement? If your toy box seems a bit fragile, consider adding extra support. This proactive step can ensure durability and safety for years. Reflect on your experiences with maintaining other household items. What lessons can you apply to your toy box maintenance?Frequently Asked Questions
What Materials Do I Need For A Toy Box?
To build a DIY toy box, gather wood, screws, hinges, sandpaper, and paint or stain. You’ll also need a saw, drill, and measuring tape. Choosing durable wood like plywood or pine ensures longevity. Personalize with paint or stain to match your decor.
How Long Does It Take To Build?
Building a DIY toy box typically takes about 4 to 6 hours. This timeframe includes cutting, assembling, and finishing. It depends on skill level and complexity. Allow additional time for paint or stain to dry. Preparing materials beforehand can streamline the process.
Can Beginners Build A Toy Box?
Yes, beginners can build a toy box with basic tools. Start with a simple design and follow a detailed plan. Many online tutorials offer step-by-step guidance. Ensure safety by wearing protective gear and working in a well-lit area.
What Are The Benefits Of A Diy Toy Box?
A DIY toy box is customizable and cost-effective. It allows personal design choices and material selection. Building your own saves money compared to store-bought options. It also provides a sense of accomplishment and can be a fun project.
Conclusion
Building a DIY toy box is fun and rewarding. You save money and gain a useful skill. Your child gets a special place for toys. A homemade toy box adds charm to any room. Plus, you can customize it as you like.
Choose colors and designs that fit your style. Remember to involve your kids in the process. They will enjoy helping and using the toy box later. Start crafting today and make playtime tidier and more enjoyable. A DIY toy box is a simple project with a big impact.
Happy building!